

I apologise for not posting during the week but I have had a week of catching up with people I have not visited for ages and just doing very little. We attended the funeral of my beloved aunt on Monday and today my Mum and I attended the Deloraine Craft Fair. I did not take any photos as I was unsure of how the artists would feel about it but will provide some links to the pages of people exhibiting there that I found most interesting.
You can find some photos here that have been taken by a newspaper. This is not a craft fair in terms of buying fabric etc, this craft fair is all about the finished product. Spend some time going through the website.
This year one of the showcases artists is Alison Holt and her free motion machine embroidered scenes are just breathtaking and exquisite. Her website is HERE.
Maree Caplin is a Tasmanian lady and her work was in the Hoffman challenge. Ken Smith also was doing free motion embroidery.
Thursday, 31 October 2013
Sunday, 27 October 2013
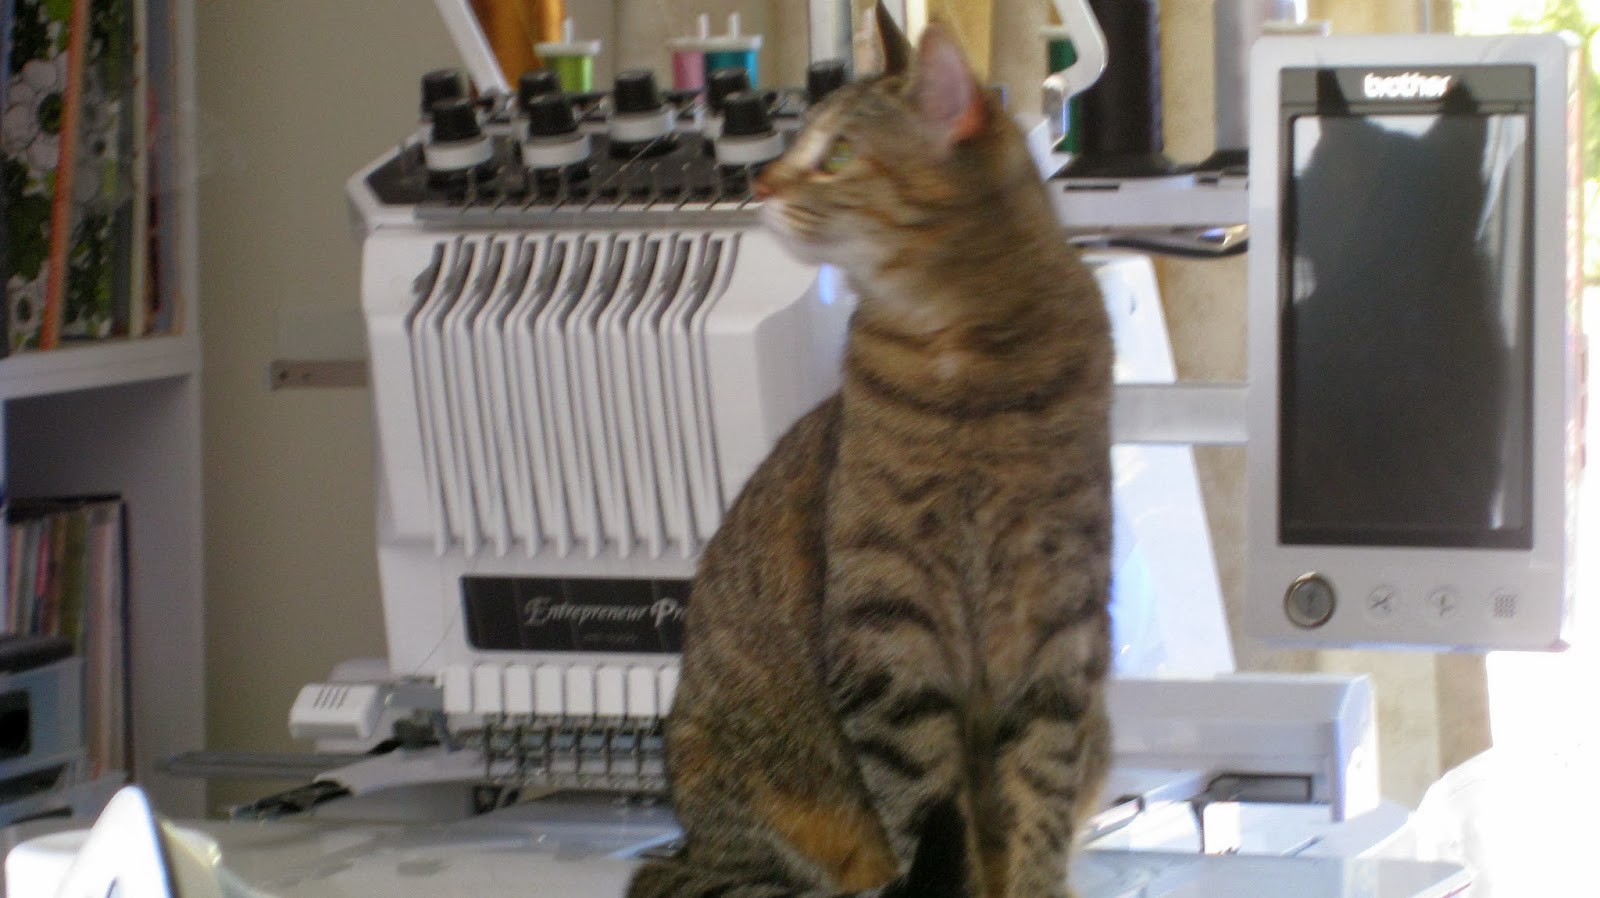
A Day in the Life of A Cat
The cats have kept me very busy today. Hallie is extremely inquisitive and is always wanting to help me with my sewing. She sits and looks at me and I am sure that she has been here before.
Do you need me to turn this machine on now Mum?

or perhaps tidy that cupboard because it could do with a bit of a spring clean
We have to team up to keep a look out for that intruder from across the street and here he comes

It's war now ! We will frighten him away because he can't get us in here.

Now that he has gone and all the excitement is over it is time for a sleep on Mum's newest quilt but I can still keep an eye out of this window for more intruders.

The afternoon sun is just the thing for having a long nap in

Even if I do keep one eye slightly open

Mum has been pressing her sewing and this ironing pad of hers is so warm. Pity she only washed the nice white cover yesterday

Saturday, 26 October 2013
Lillico Beach Little Penguin Season
We have been going every Saturday night as volunteer guide at the Lillico Beach conservation area since the new season for the year started mid September. At the moment the penguins are nesting and we are hopeful of having chicks in approximately 4-5 weeks time. The little penguin have some large driftwood to negotiate if they want to come up their ladder this year. The driftwood has increased in size with some of the rough wether we have had over the last few months. Penguins take their bearings from landforms and driftwood placement etc so we do not move it. Last night we saw about 10 penguins come ashore while we were there whilst some eagle eyed children spied some others courting each under the platform
 |
| Driftwood on Lillico Beach |
As we arrive at the platform just before sunset the sky changes rapidly.


The Spirit of Tasmania can be just seen as it starts to nudge past Don Heads on its nightly crossing across Bass Strait to Melbourne.

Hints and Tips 22- Eliminating Bunny Ears on Pillows
I have been meant to do this hint for a while as it is one I talk about when giving a presentation to a machine embroidery/quilting group.
When we stuff a cushion/pillow firmly more likely than not we end up with little pointy corners especially if the fabric has a fair bit of body. Sometimes I am quite OK with this effect as seen in my Believe pillow that I made for my daughter.. There is a fix but it is not quite so easy with pieced pillows.

The bunny ear effect can be eliminated with a bit of pre planning before cutting especially if the pillow is made of plain all over fabric or has borders that are plain strips.
I have made two small example pillows from sheeting that are only 10 inches square when finished.The first one I did not modify in any way and you can see that there is a small bunny ear effect


With your ruler place a mark about 1/4 inch out form your drawn line on the middle middle of each side as shown


Repeat for all four sides.
You can then trim back to these lines leaving 1/4 inch for seam allowances.

Alternatively you can just leave the seam allowances, stitch on the drawn lines and then trim back.
My finished very very rough samples are below. The my first attempt without any modification is on the right and the one I extended the sides out is on the left. Please keep in mind that these have not been stuffed very well and are made from very flimsy fabric but you can gauge the effect and the results.

Friday, 25 October 2013
Cats in Their run
I have been meaning to try and take a pic of the cats in their outside run and I have done so this morning. They have a tunnel going from a cat flap in the window out to this hen house that sits on our deck. Isn't the clematis just beautiful. Clematis can be poisonous to animals, although poisoning is very rare if they eat it but we have had it for years and our other cats have never touched it. We will have to make e that the plant does into try and snake its way too much into their house.


Thursday, 24 October 2013
Remembering
It has been a very sad time this week with the death of my dearly loved Auntie Nellie who was very close to my Mum. Auntie Nellie was the wife of a farmer and was very busy. She worked tirelessly for her local church and many charities including the cancer auxiliary at one of the large regional hospitals. She was a fantastic cook and adjudicated as a judge in the cookery section at many country shows. She will always be remembered fondly and so sadly missed.

I have done very little sewing and can't seem to settle to do anything. I was looking at the free sewing alpha over on the Bernina blog and with the letter U being put up for download thought it may be a good idea to make a bag for my quilting ruler. It always seems to be hanging out of my tote boxes whenever I have to take it anywhere. Think the bag will have the front embroidered with the word "ruler" and a pocket for the rotary cutter. May also perhaps put some other pockets on the back of the bag. May be a little while down the track before I get it sewn out but at least the embroidery design is ready to go.

I have done very little sewing and can't seem to settle to do anything. I was looking at the free sewing alpha over on the Bernina blog and with the letter U being put up for download thought it may be a good idea to make a bag for my quilting ruler. It always seems to be hanging out of my tote boxes whenever I have to take it anywhere. Think the bag will have the front embroidered with the word "ruler" and a pocket for the rotary cutter. May also perhaps put some other pockets on the back of the bag. May be a little while down the track before I get it sewn out but at least the embroidery design is ready to go.
Wednesday, 23 October 2013
Bonnie Hunter's New Mystery
Bonnie Hunter over at Quiltville has revealed the colour palette she is using in her new mystery quilt. The mystery quilt titled Celtic Solstice obviously is inspired by Ireland and all things green,orange and white with a bit of yellow and blue thrown in for good measure. Looks like she is using the Tri Recs ruler so have just ordered one. I love rulers that make strip cutting and the appropriate rulers so much easier for making all things triangle. Now it is off to collect my fabrics and wait anxiously for November 29th when the first clue is released.
Think I may be varying my fabrics slightly. For the neutral I will go for my black on whites and think my blue may be teal. Also think the yellow may be substituted for pink as yellow is not abundant in my cupboard by the look of it.
Tuesday, 22 October 2013
Hints and Tips 21 - How many strips do I need?-how to calculate the number of strips/units you need to make a border
When making the Redwork Woodland owl quilt I had to determine the number and best size to cut and stitch strips to fit the border of the quilt.

I wanted it to have an odd number of pieces so that the border ended with a dark coloured piece on each end of the strip
Once again I used the formula, this time working backwards.
Number of strips/ units= (Required border/strip length - 0.5) ÷ (strip/ unit width - 0.5)
Example 1
I need strips to make a border that is 40 1/2 inches long and I would like to use 2 1/2 inch wide strips.
I need strips to make a border that is 40 1/2 inches long and I would like to use 2 1/2 inch wide strips.
The calculation is:
(40.5 - 0.5)
÷ ( 2.5 - 0.5)
= 40 ÷ 2
= 20 strips
= 40 ÷ 2
= 20 strips
I would like to make an odd number of strips so I will make the strips a little smaller 2 1/4 inches
(40.5 - 0.5) ÷ ( 2.25 - 0.5)
= 40 ÷ 1.75
= 22.8 strips
That is just a little under 23 so we will round up to 23 and that will give me the number of strips.
= 40 ÷ 1.75
= 22.8 strips
That is just a little under 23 so we will round up to 23 and that will give me the number of strips.
Example 2
I need to have a border of 65 inches long and I would like to make 3.0 inch pinwheels blocks
(65 - 0.5) ÷ (3.0 - 0.5 )
=64.5 ÷ 2.5
= 25.8 pinwheels which we will round up to 26 pinwheels.
=64.5 ÷ 2.5
= 25.8 pinwheels which we will round up to 26 pinwheels.
Example 3
If my border was 90 inches long and I wanted to put in 5 inch pinwheels,
The number I need is
(90 - 0.5) ÷ (5.0 - 0.5)
= 89.5 ÷ 4.5
= 19.9 or rounded up 20 pinwheels.
= 89.5 ÷ 4.5
= 19.9 or rounded up 20 pinwheels.
I have included a fraction to decimal conversion table for common values

Monday, 21 October 2013
Those of you with Yahoo email
I have posted before about those of you have Yahoo email addresses and the problems I have with my anti virus software. If you have a Yahoo email address it is quite possible when you send me an email and you do not hear back from me it has probably gone to spam and I will automatically delete it. Also when sending out BOM's and they are not delivered I do not spend an hour or so trying to send to bounced emails. I know this is not very generous of me but it is just how it is. If you have another email address that you use and you want to receive all of the BOM's then you can get me to change to that address.
Hints and Tips 20 - How wide should the finished width of my strip set be?
How may times have you stitched a strip of similar width strips together and then wondered what they were supposed to measure if using an accurate 1/4 inch seam?

I have made this handy reference table so that you can instantly calculate what your finished width should be depending on the number of similar width strips you have.

I do not know if someone has done this already but this is my version. I could do a spread sheet with all of the values in it but research tells us that we need to keep our brains active to prevent the onset of dementia.
Finished width of strip band
= (Width of individual strip - 0.5) x (number of strips you have) + 0.5
For example if you have stitched together 9 strips that are 3 1/4 inches wide
Finished width = (3.25 - 0.5) x 9 +0.5
=2.75 x 9 + 0.5
= 25.25 inches
For example if you have stitched together 16 strips that are 2 3/8 inches wide
Finished width = (2.375 - 0.5) x 16 +0.5
=1.875 x 16 + 0.5
= 30.5 inches
Don't forget if you wish to print or download any hints and tips as pdf just use the print friendly button at the top of the blog.
Sunday, 20 October 2013
Vintage Treadle and Hand Crank Sewing Machine Heaven
This afternoon my husband and I took a leisurely Sunday drive to the neighbouring town of Latrobe to have a look at their Antiques Fair. We met Coral Howe a lovely kind, friendly and helpful lady who was displaying a small portion of her extensive vintage sewing machine and glass lamp collection. I hope I can remember the names of them all.
 |
| Coral Howe |
These were display items only and not for sale. I concentrated on taking pics of the vintage sewing machines and there were some beauties.
This machine was a Ward and was one of the first free arm machines. The machine bed swung down to reveal the free arm
 |
| Ward Free Arm |
 |
| Ward Free Arm |
This lovely shaped machine was called an Avenue
 |
| Avenue Sewing machine |
This lovely machine with beautiful little mother of pearl flowers is an early Singer.
 |
Early Singer |
Coral repainted this ABC machine as it had been badly painted in an inappropriate colour previously.


Coral also had this Rowley repainted as it had been a blue colour in very bad condition previously.


I forgot to ask the name of this one below. The decals are just beautiful

There were four treadles on display including this Pfaff
 |
| Pfaff treadle |
a small Willcox and Gibbs in a treadle case, this was about the size of a child's toy.
 |
| Willcox and Gibbs |
A Howe treadle

 |
| Howe treadle |
and I have left the best to last. This is a gorgeous Singer that was built in 1878 and belonged to Mrs Kate McKenzie. Her name is engraved in the mother of pearl on the machine bed.

The machine was placed in this exquisite treadle cabinet made from what looked like walnut. The case on the top did not lift off as a separate unit but lifted up and folded down. The whole case came apart and folded in an under like the wings on Batman's car

The machine was placed in this exquisite treadle cabinet made from what looked like walnut. The case on the top did not lift off as a separate unit but lifted up and folded down. The whole case came apart and folded in an under like the wings on Batman's car


Coral found a piece of paper in one of the drawers and she rewrote what was written onto another piece of paper to preserve the original

 |
| Kate's name on the machine bed |


Just look at the decoration on the foot pedal

Subscribe to:
Posts (Atom)


 Quilter Blogs & Store Search