Following on from the previous post on prepping your
fabric ready to embroider I am going to
talk about pressing. Pressing is crucial to achieving success in any project
involving stitching two seams together. The golden rule of pressing is that if
a seam is going to be sewn over or attached to another then it must be pressed
before you do that. Also remember spray starch is your friend. The more starched your fabric is the better results you will have.
Finger pressing should be your first option without getting up and going to the iron
for more substantial pressing. This is the case with patchwork units like
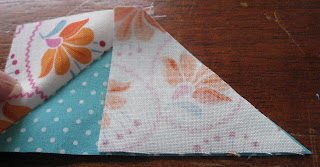
flying geese. I will finger press the first wing out of the way before I attach
the second. I only press the flying geese unit when it is completed. If you are not sure which way the seam is to go in a patchwork unit finger pressing is a good way to go.
You can
use your thumb nail to press a straight
seam open quite successfully. A trick from veteran dressmakers is to pull a
seam backwards and forwards over the edge of a table but try this with caution
with your patchwork. There are special little wooden tools that you can use to finger press but the sloped ends of a clothes peg also is good to use if you do not have the commercial tool. Wooden ones are best to use if you have one available.
Pressing is different to ironing
Ironing is where you move in a
to and fro motion all over a piece of fabric. The iron is moving and in contact
with the fabric as it does so. Pressing is where you just place the iron on a
piece of fabric and then lift it up without moving it across the fabric. If you
use an ironing motion in patchwork for example you run the risk of stretching
your fabric and if you happen to have a side of a pieced unit on the bias then
the fabric could stretch even further.
Setting the seam
Before pressing a seam either open
or to one side we need to set the stitches into the fabric. Setting
the seam leaves you with a little less bulky seam allowance to contend with. To
set the seam gently press the iron down onto the stitches and seam allowance.
There is no need to cover the whole unit you are pressing.
Press towards darker fabric
Generally we press seams toward the darker
fabric. This is especially the case where we are dealing with light coloured
fabrics and embroidered quilt blocks which may have a light background. This is
to avoid seeing the darker seam underneath. If it is imperative that you have
to press to the lighter fabric then try and trim the seam a little so that it
is not that obvious even though it was only 1/4 inch to start with.
The thing to remember when pressing to the dark side is that you always have the dark fabric you are pressing towards facing you or on the top.
To set the seam place the tip of your iron on the seam line and a little
into the rest of the unit. If it is a longer unit i.e. a strip set follow behind your fingers gently folding the
fabric out.
Lift the upper darker
fabric slightly, just enough to move the tip of the iron in and under. Glide
the iron sideways out towards the darker patch without pulling or tugging on
the upper layer. If you do not use this gliding motion the seam can roll and
distort.
If you are pressing
units that have bias edges especially make sure that you press in the direction
of the straight grain.


 Quilter Blogs & Store Search
No comments:
Post a Comment